
How To Build Your Very Own Indoor Firewood Rack

POP Projects is a collection of new and classic projects from more than a century of Popular Mechanics. Master skills, get tool recommendations, and, most importantly, build something of your very own.
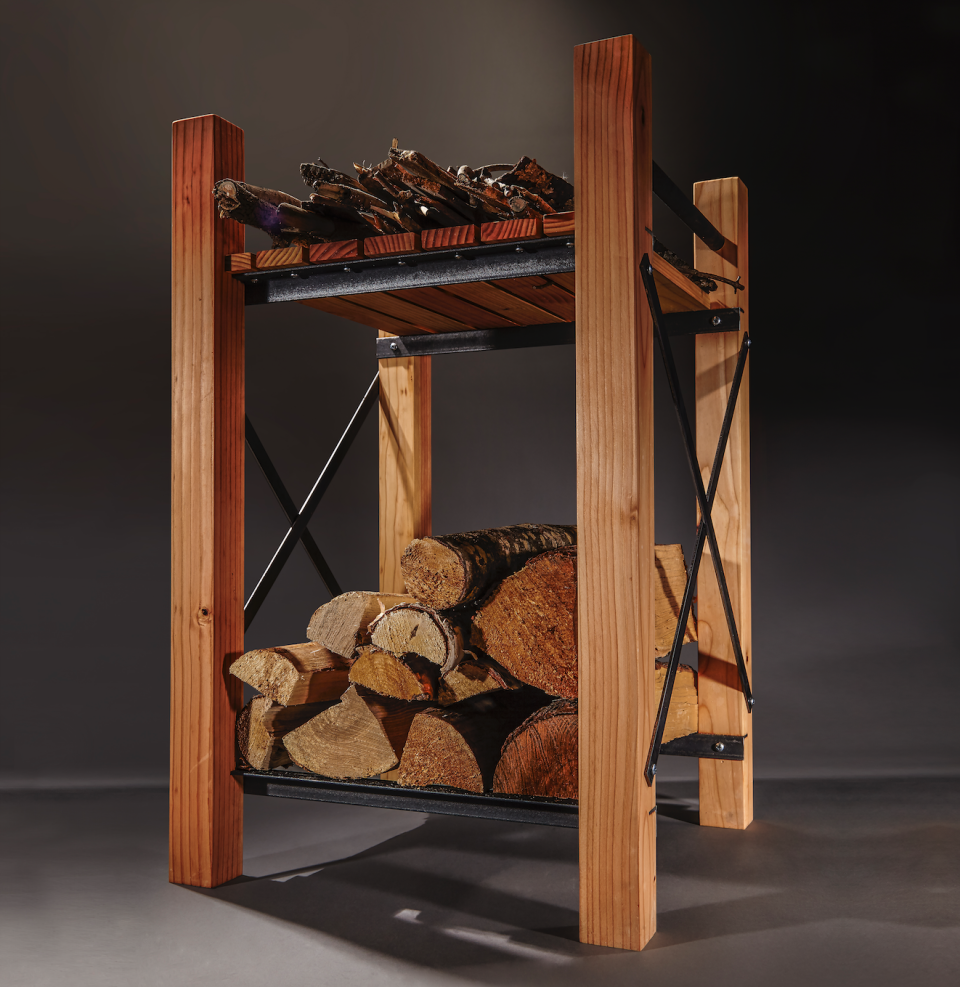
When we set out to design an indoor firewood rack, we wanted it to be sturdy and made from materials you can buy at any home center or lumberyard. So we designed our rack from ordinary 4 x 4 lumber, steel angles, and flat stock.
To turn a rough 4 x 4 into flawless 2 x 2 stock is no great mystery, and we show you how. But you do need a table saw and a benchtop thickness planer. If you don’t own those machines, you can still build this rack by ordering clear 2 x 2 stock from a lumberyard.
This material is quite attractive and will make the rack look lighter since its actual dimensions are 1 ½ x 1 ½ inches, whereas our material measures a full 2 inches. Going this route is a good option, and the rack will still be plenty strong. Either way, let’s get started.
Some Tools You Might Need
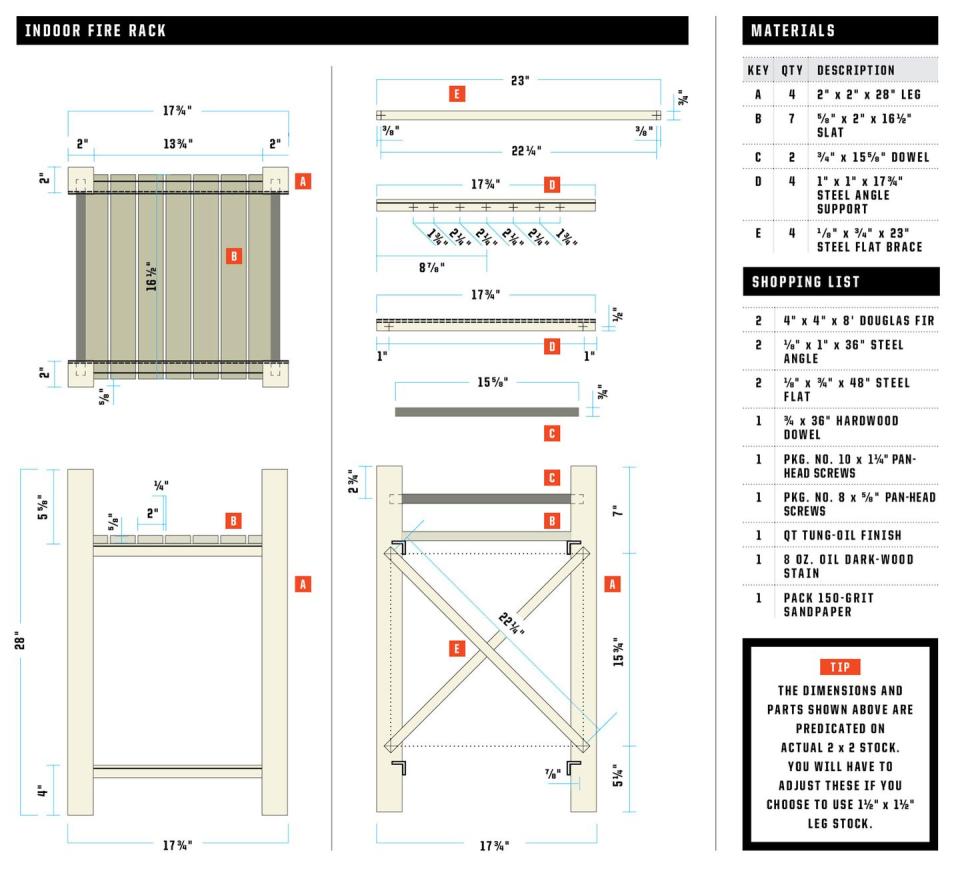
The Plans and Materials
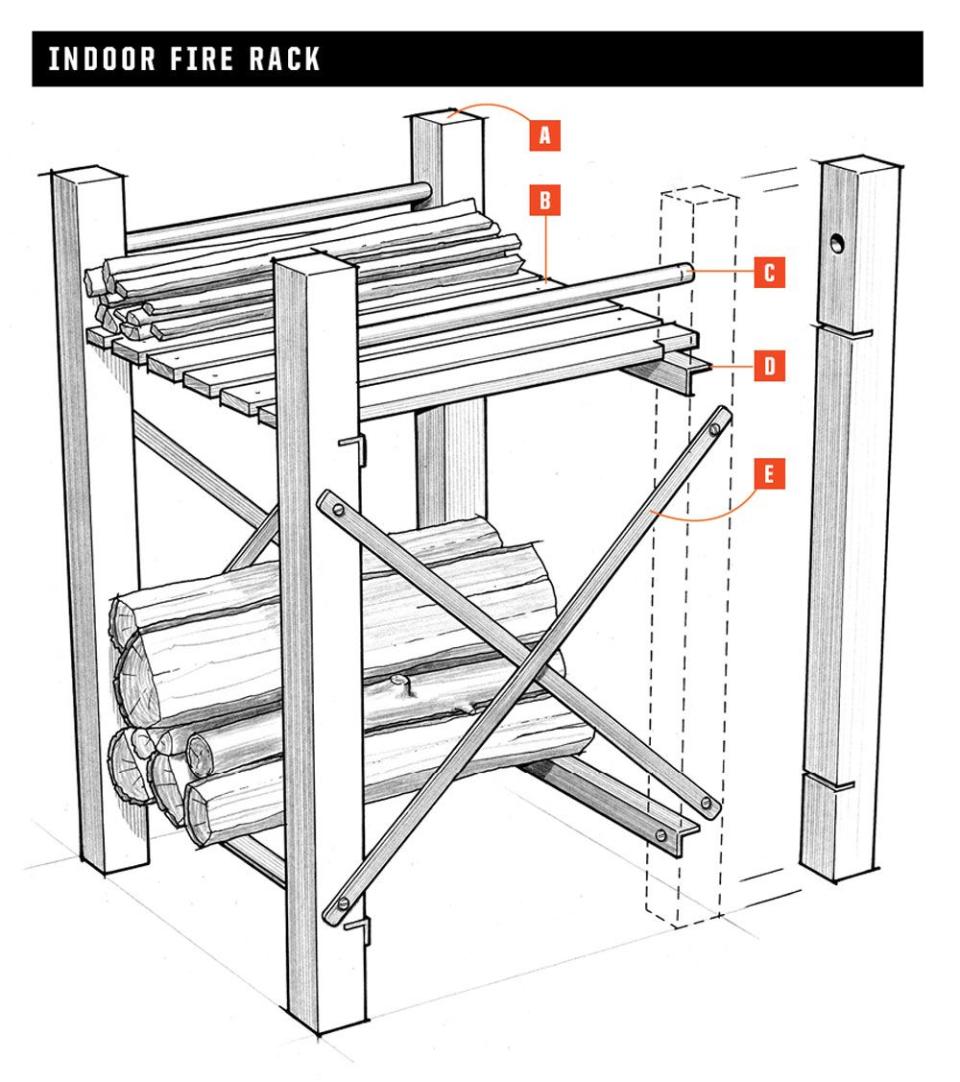
Make the Legs
Sight down each piece of 4 x 4, and mark off four rough lengths that are flat and straight with few or no knots. Crosscut these four lengths. On each piece put a reference mark on the end grain to indicate the flattest side. In the diagram below, the reference side is shown with a small triangle.
Begin by running each 4 x 4 length through the benchtop planer with the reference surface facedown. Then take a light pass to surface--plane the opposite face. Repeat this operation on the remaining three pieces. Now flip each piece over end to end, lower your planer’s thickness setting, and run each piece through the planer again. Continue this operation and sequence until all four pieces are flat, parallel, and the same dimensional thickness.
At the table saw set up a standard 50-tooth combination blade and raise it to around 2 inches. Adjust the fence for 2 3⁄8-inch-wide rip. Choose the best square edge relative to the freshly planed faces, and run this edge against the fence. Flip the workpieces over with the same edge against the fence, and finish ripping through the thickness of the 4 x 4. The waste piece from this step will become a slat for the top.
A full-dimension 2 x 2 (2 inches wide by 2 high) is not a typical size of lumber. An old-fashioned lumberyard with a mill workshop might be able to make it for you. But most lumberyards and home centers can order you nominal 2 x 2 stock (1 1⁄2 x 1 1⁄2inches), or you can get it from lumber suppliers online. It’s also helpful to know what to ask for. Some lumber suppliers will call it 2 x 2, others call it baluster stock. This can be as large as 1 9⁄16 x 1 9⁄16 inches to as small as 3⁄4 x 3⁄4 inch. If you need to cut your own from a 4 x 4, here's how:
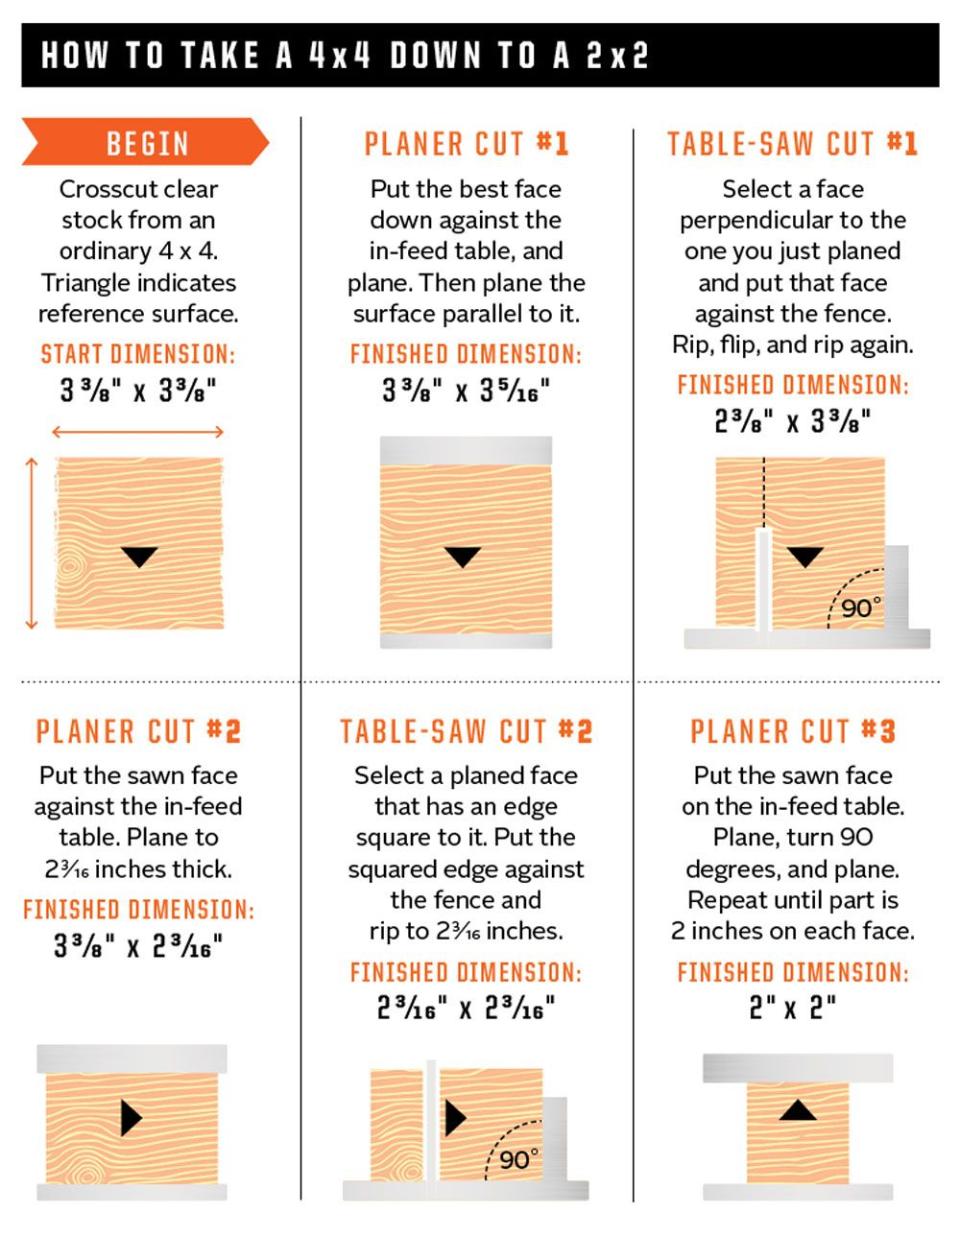
Using the sawn surface as the reference facedown against the in-feed table of the planer, make a couple of very light passes. Flip the workpieces over and plane the opposite surface. Make another couple of light passes. The wide faces of the rectangle you’ve produced should be flat, straight, and parallel to each other.
Return to the table saw. Choose an edge that’s square to one of the freshly planed surfaces. Run that edge against the fence. Rip the four legs to 2 3⁄16 inches wide.
Plane the workpiece to its finished dimensions. First make a very light pass with the freshly sawn surface facedown on the in-feed table. Turn each leg 90 degrees and make another pass through the planer. Reduce the height setting of the thickness planer and repeat this process until all the legs are exactly 2 inches square.
Plane the remaining slat pieces to their finished thickness. Rip the slats to finished width at the table saw. Crosscut the slats and the dowels to finished length.
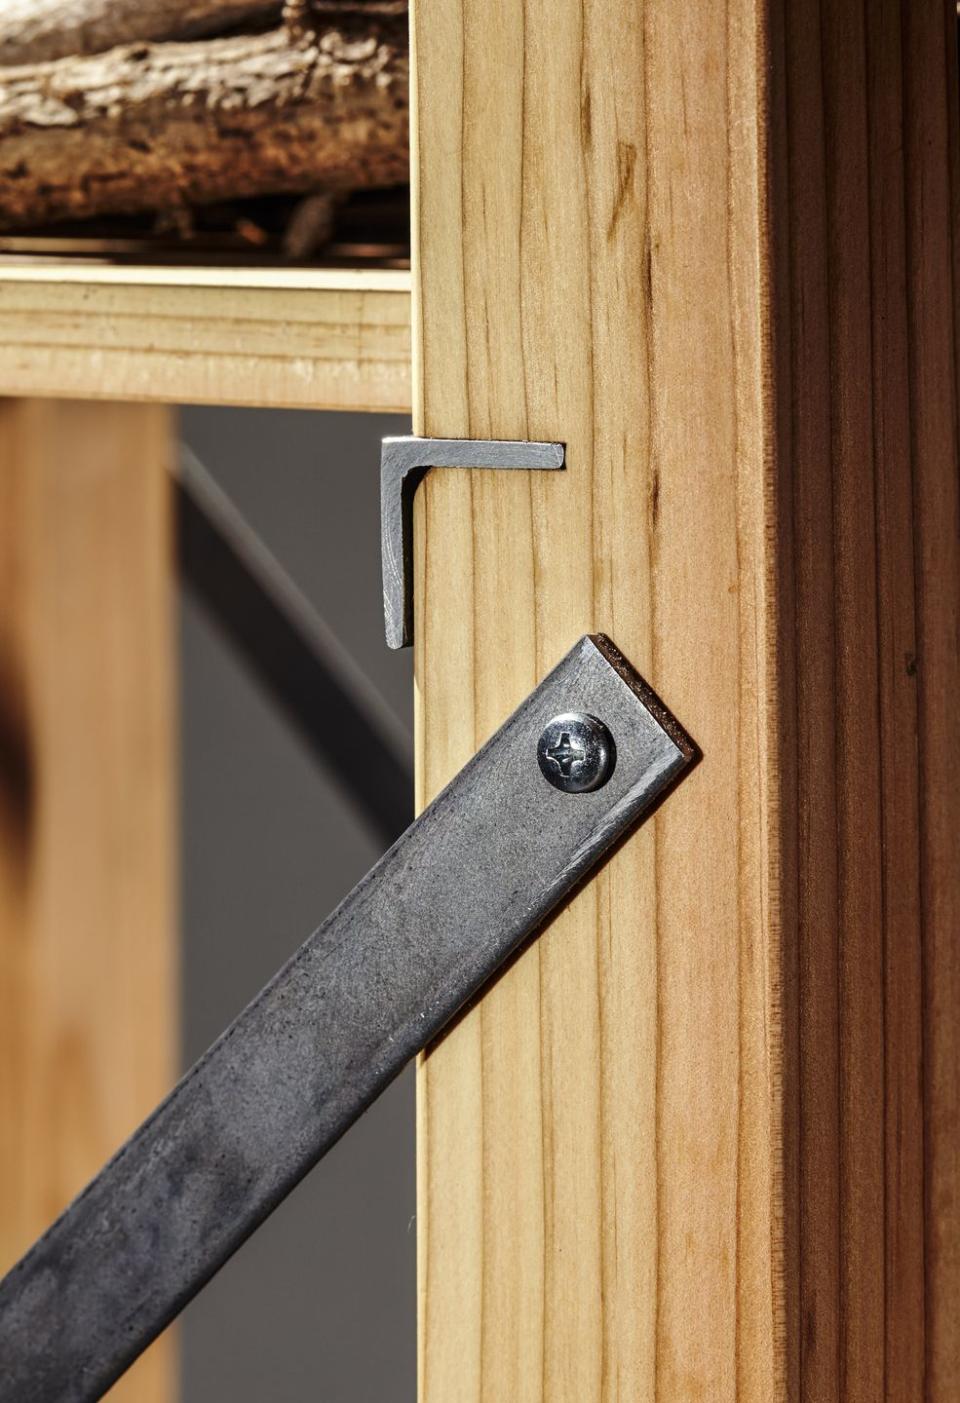
Now crosscut the legs to finished length. Measure down one face of each leg and lay out a centerline for the dowel hole. On the drill press, drill a 1-inch-deep hole. On the same face of each leg draw a line from each end to locate the groove for the steel angle.
Set the table-saw blade to slightly more than 7/8 inch high and, using the miter gauge, cut the groove for the steel angle. Complete each groove by taking a wood file and making a slight chamfer on the bottom edge of the groove (as shown).
Metalwork
Crosscut four pieces of steel angle stock to finished length. Use a mill file to square the ends and round off any sharp corners. Lay out, center--punch, and drill the holes in the ends of these pieces, which will allow them to be mounted to the legs.
On two of the steel angle pieces measure and mark the row of holes to fasten the slats. Clamp a wood fence ½ inch back from the centerline of your drill-press chuck to position the steel angle (Fig. 1).
⚠️ It is important to be accurate in making this row of holes. You need consistency in two dimensions—hole to hole along the length and centered across the width of the steel angle. If you don’t drill this row of holes precisely, you’ll have a difficult time fastening the slats.
Next crosscut the steel flat stock, round off any sharp corners with a mill file, center-punch, and drill a hole near the end to mount the flat to the legs.
Sand all the wood pieces with 150-grit sandpaper and ease all sharp corners on the legs and slats. Finish with a wipe-on coat of tung oil to the legs and slats. Stain the dowels dark brown or ebony. Clean the steel pieces with No. 00 steel wool and denatured alcohol, then apply tung oil. Let the oil soak into the wood and steel before wiping off excess.
One jig for the drill press helps to ensure accurate drilling. Another jig helps to ensure accurate assembly. Both are built with nothing more than pieces of scrap.
Make an assembly jig (Fig. 2) consisting of a piece of plywood and three strips of wood to help you assemble the legs and two pieces of steel angle. The jig keeps the legs parallel during assembly, and a piece of scrap wood wedged between the legs forces them against the jig’s side pieces.
Place the steel angles into their grooves, drill a 9/64 -inch pilot hole into each leg, and drive the pan-head screw to fasten the steel angle to the legs.
Now take these two assemblies (of two legs and two steel angles) and stand them up in the same jig. Clamp a rafter square in position (Fig. 3). Measure 7 inches from the top of each leg, and make a small mark with an awl to locate the position of the screw that fastens the flat steel crossbrace, then drill a 9/64 -inch pilot hole in each leg.
Fasten the crossbrace to the leg with a No. 10 screw, but don’t fully tighten it. Repeat on the opposite piece of flat stock. Now swing the bottom of either piece of flat stock into position. Center it by eye on the lower face of the leg; fasten in place, and tighten the upper screw.
Repeat the fastening procedure on the opposite piece of flat stock and on the opposite side of the rack.
Complete the Rack

Predrill a shallow 1/8 -inch pilot hole near the ends of five slats. Locate these by making a center mark in the slat’s width and then measuring 1 inch in from the end. Mark the pilot-hole position with an awl.
Fasten the five center slats to the top. Use a jigsaw to cut the notches in the end slats. Next, use the hole in the steel angle as a guide and use an awl to mark the pilot hole. Remove each end slat and predrill the pilot hole, then fasten in place.
Touch up any uneven areas with tung-oil finish. Let the finish dry thoroughly before putting your rack into service. You may notice that the finish gives off a slightly nutty aroma if the rack is placed close to a woodstove or fireplace. That will fade with time, but it reminds you of your craftsmanship when the rack is new.
You Might Also Like

